

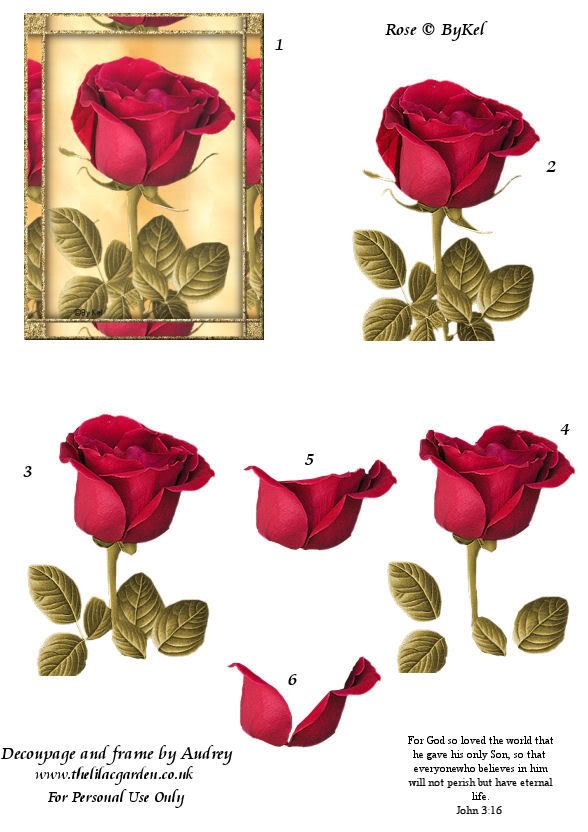
This one has a base image with a frame around it, and I'll be building on that. So first cut out your images. Use small scissors and cut as close to the image as you can. You'll have to leave a little extra around stems, or sometimes you can just eliminate the stem and use just the leaf. I cut the base piece on my paper cutter. Here are the pieces all cut:

To assemble the pieces, use 1/16" foam dots. Turn over the piece that goes on the base (it was marked #2 on the sheet) and put dots wherever support will be needed. This rose has a lot of layers, so I use a lot of dots for good support. I cut thin strips to put under the rose stem to help support that. Remember to work from the bottom layers, up:

Lay that on top of your base and press down. Repeat with all of the layers until it's done. It's easy to tell which piece is next-there will be less detail on it. You can also number the backs of the pieces as you cut them out. Here's the assembled image:

And that's all there is to doing a decoupage sheet image for a card! To finish this card, I mounted the rose on a scalloped frame I cut from Storybook at 4 1/2". I mounted that on some dark red cardstock that I had adhered vintage lace to (the lace is taped to the back of the cardstock). I cut Jasmine corners at 4 1/2" and 5" on shadow, and adhered them with foam dots. The little bird was cut with Home Decor (can't say enough good about that cart!) at 1 1/4" and shadowed. That was adhered with the foam dots too. Any cricut or punched butterfly will work, but mine was an image I printed and layered 4 times. I used glue dots on that instead of foam dots. The card was finished up with self adhesive pearls on the lace and rose frame. Sorry I couldn't take pictures of all that--I had to hurry and get this done and in the mail! But here's the finished card:


And click HERE for a ton of links to decoupage images. Hope this pictorial was helpful! I've never done one before, so if I left out anything you need to know, just ask! And thanks for taking a peek!


Absolutely beautiful. TFS the instructions.
ReplyDeleteAwesome. Thanks for the instructions. I will definitely try this now that I know what to do.
ReplyDeleteOh my gosh, so beautiful and delicate and vintage looking. This is gorgeous!
ReplyDeleteThanks for posting the instructions...You do beautiful work. I'll have to give this a try!
ReplyDeleteThank you for showing us how to do this!
ReplyDeletethank you so much for sharing the instructions... I hope I will be able to do it.
ReplyDelete